Funding your music career is a challenge, especially as an early stage artist. One of the easiest ways to start generating revenue is to monetise your fanbase, big or small, by selling merch. If you have a Bandcamp account, selling merch is a piece of cake!
Fanbace enables you to sell Merch on-demand (PoD), you don’t have to take risks or invest in stock before you can make a sale. We’ll show you how you how to start selling merch on Bandcamp in a matter of minutes.
Are you ready to take your music career to the next level? Keep reading and we’ll guide you through the steps.
Setting up your Fanbace account
To create and save your first products on Fanbace, you’ll first need an account. You can easily create your free account here. Follow the step-by-step instructions and you’re ready to start creating your first merch.

Creating and saving these new products on Fanbace couldn’t be any simpler. Intuitive design and uploading options allow you to get your products ready for launch in no time.
Creating your first Fanbace products
Once your account is set up, you’ll be taken to your Fanbace dashboard. Click on the ‘Product Creator’ button in the top left to get started. From here you can create new products, edit existing ones and browse an array of different product types.
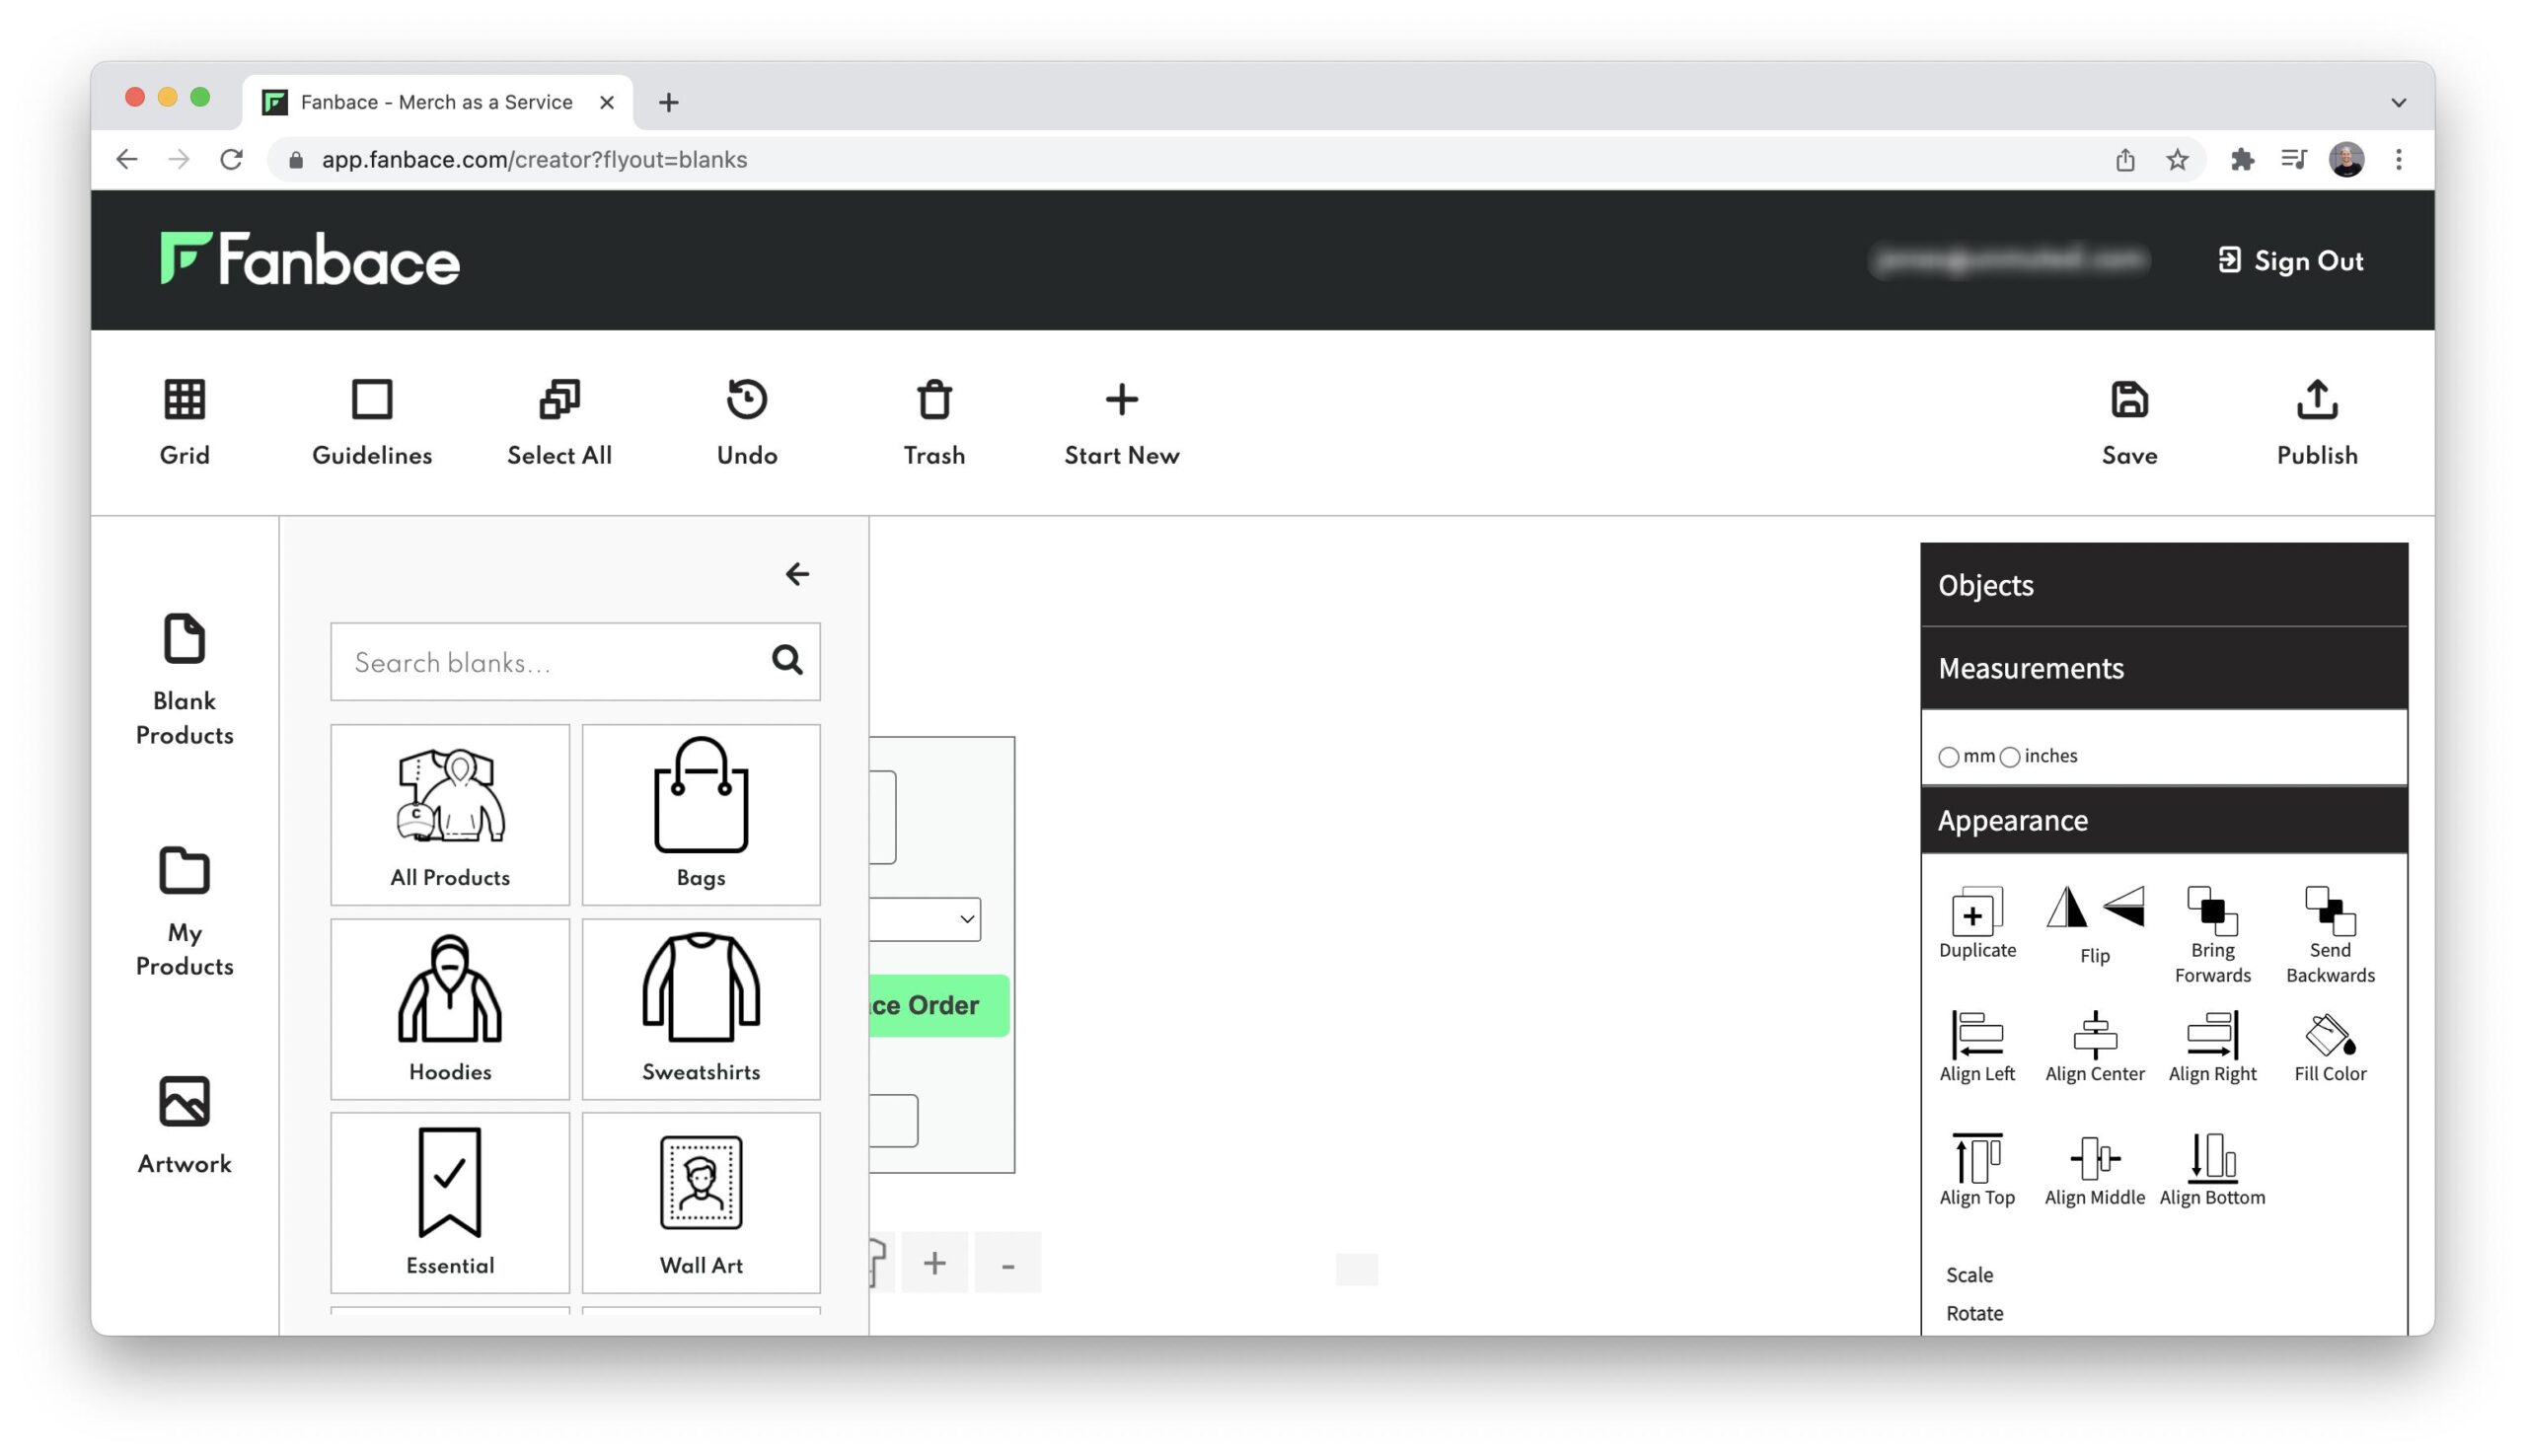
Fanbace allows you to experiment with all of these different product types in one place. You can choose anything from t-shirts, hoodies and sweatshirts all the way to bags, wall art to things like mugs and drinkware.
TL;DR Check out our video tutorial on how to create your first Fanbace products.
1. Pick a product type
Find a product type you like and choose a blank design to get started. Next, you’re going to upload your artwork design. You’ll need to create a folder in the ‘Artworks’ tab of the Product Creator to do this.
Creating artwork folders allows you to separate your merch designs for different tours, exclusive releases, collaborative merchandise campaigns and keep all of your different designs neatly organised for future use.
2. Upload product images
Name your new folder, open it and click on the upload image button. You can upload an image straight from your device or even use Facebook or Instagram to find your designs just to make sure that the image matches our minimum quality requirements.
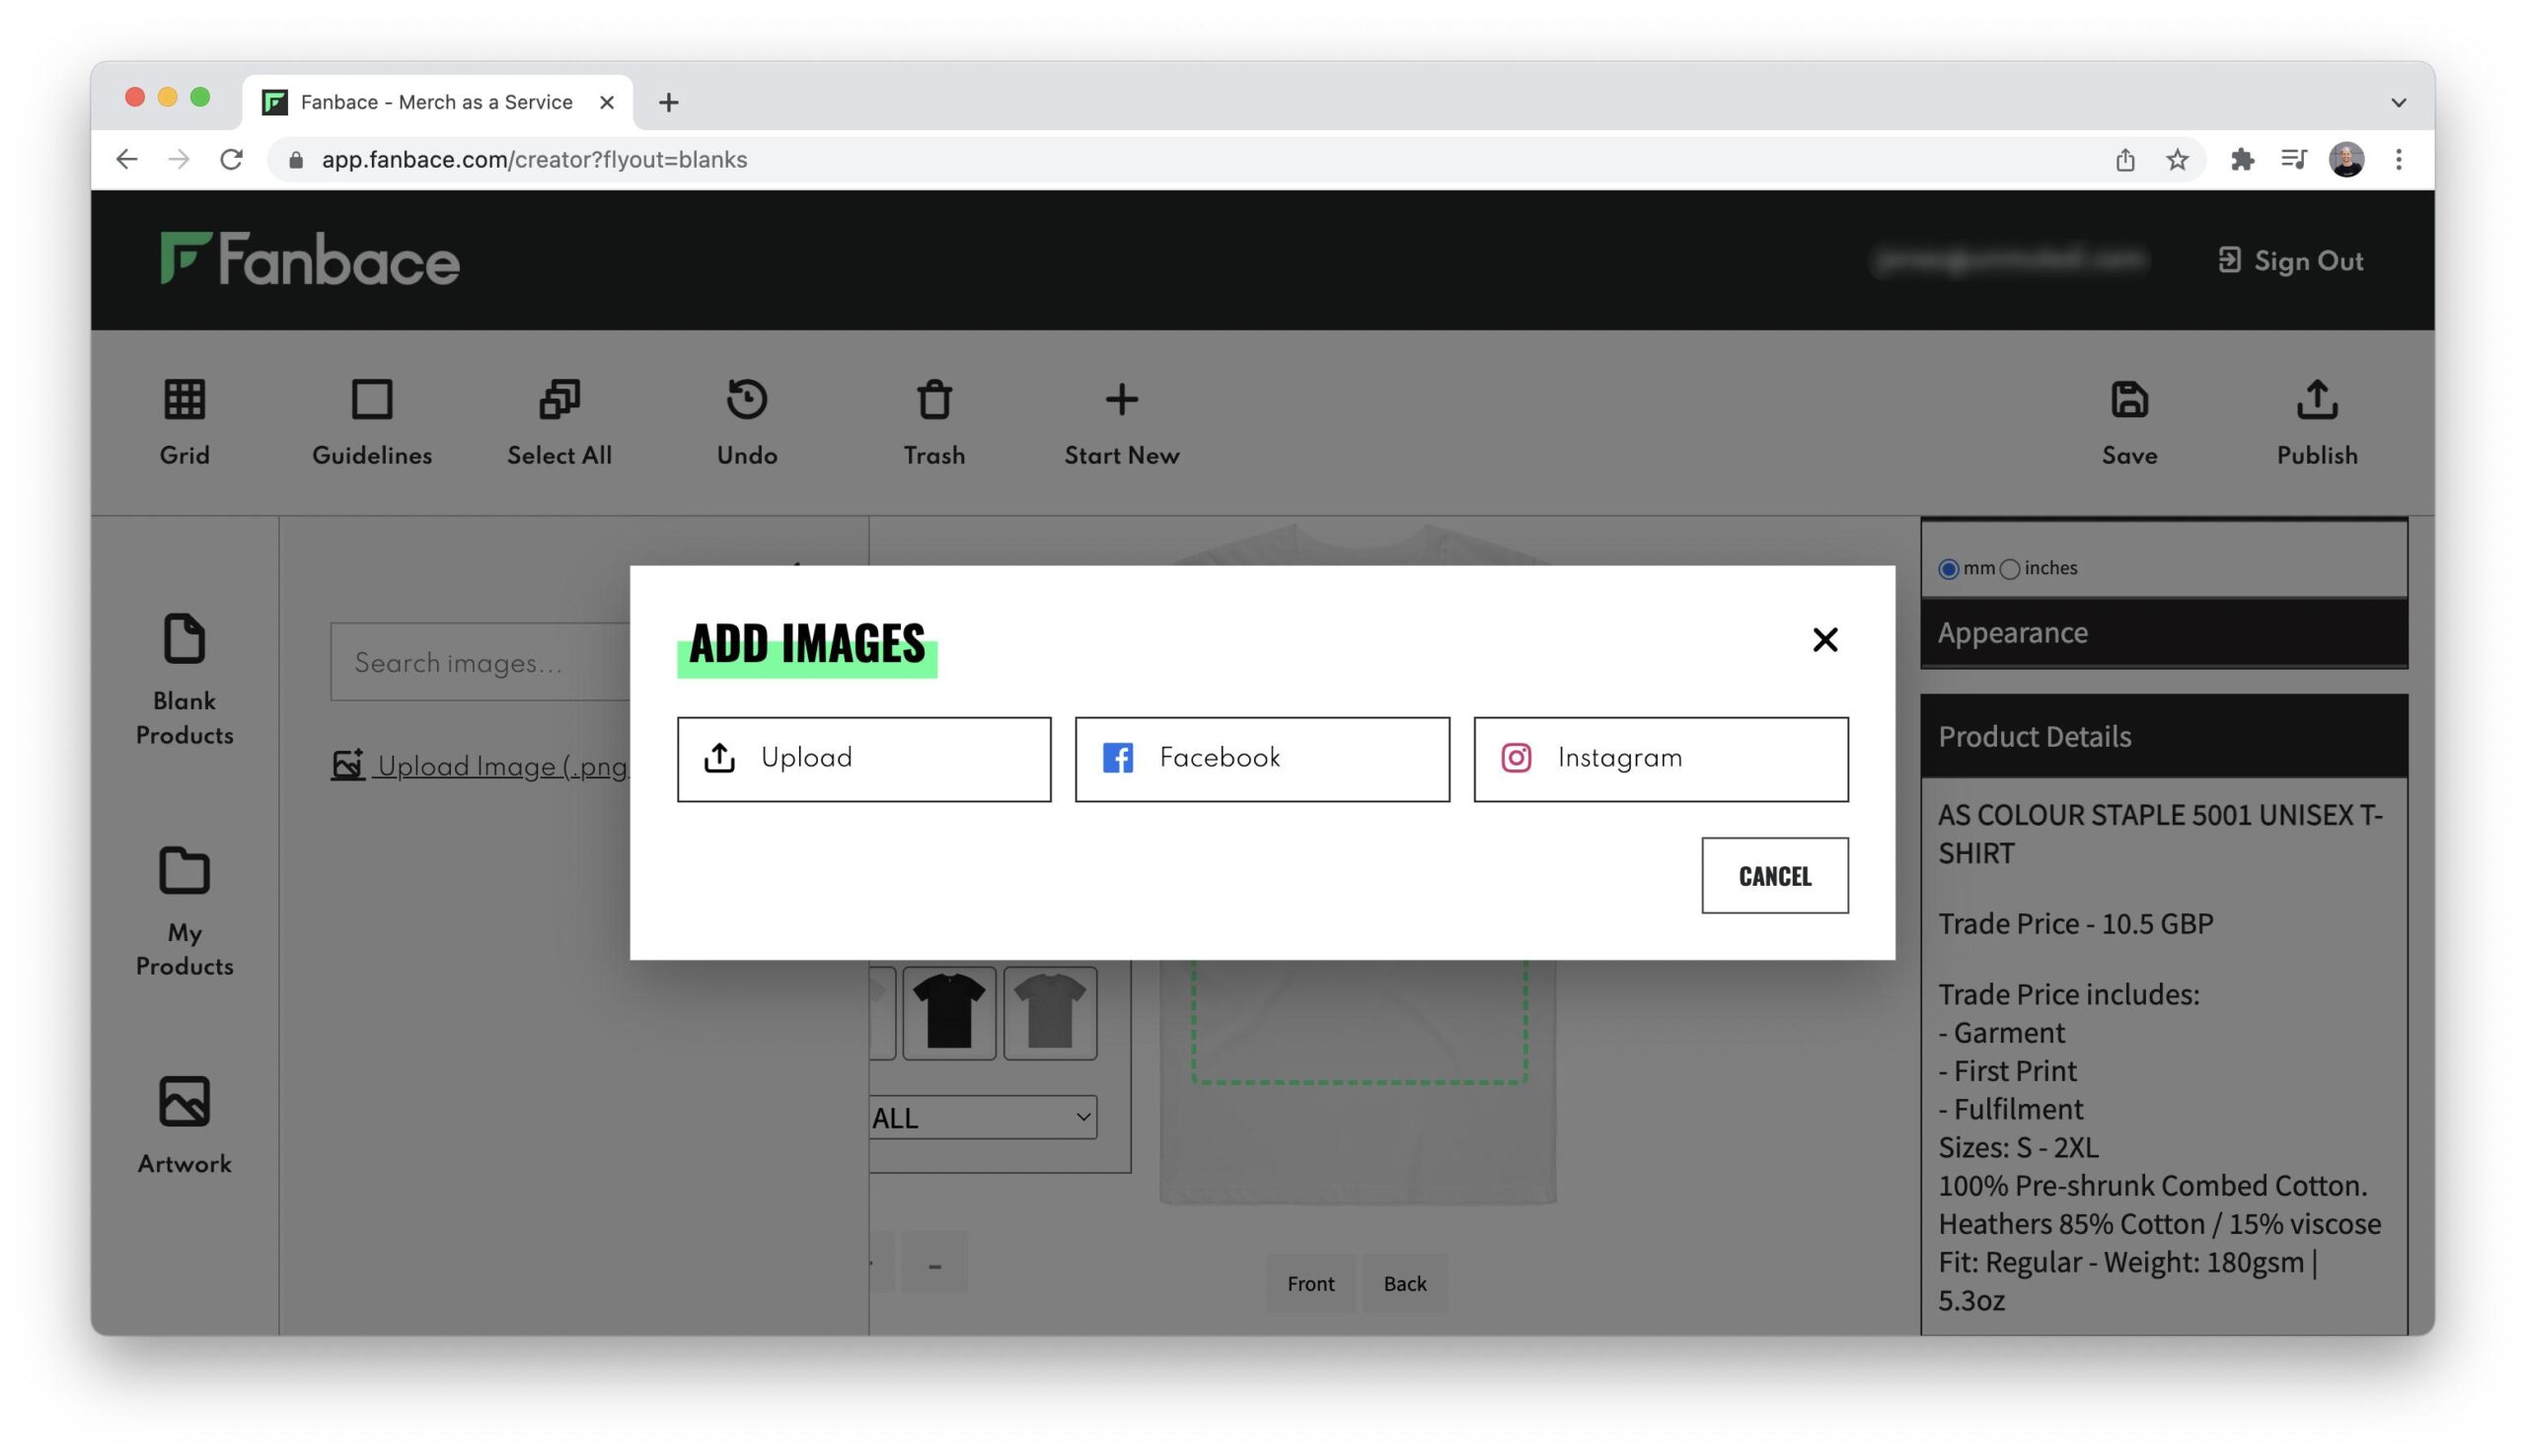
Choosing the right images
The minimum quality requirements for uploading artworks to Fanbace are the following:
- RGB colour profile
- Minimum resolution of 300dpi
- PNG file with a transparent background
Make sure you scale your designs for the largest print size you’re going to need, and trim canvas to the nearest pixel possible.
Once you’ve checked your images meet the minimum requirements, upload them, give them a name and you’re ready to start designing your products.

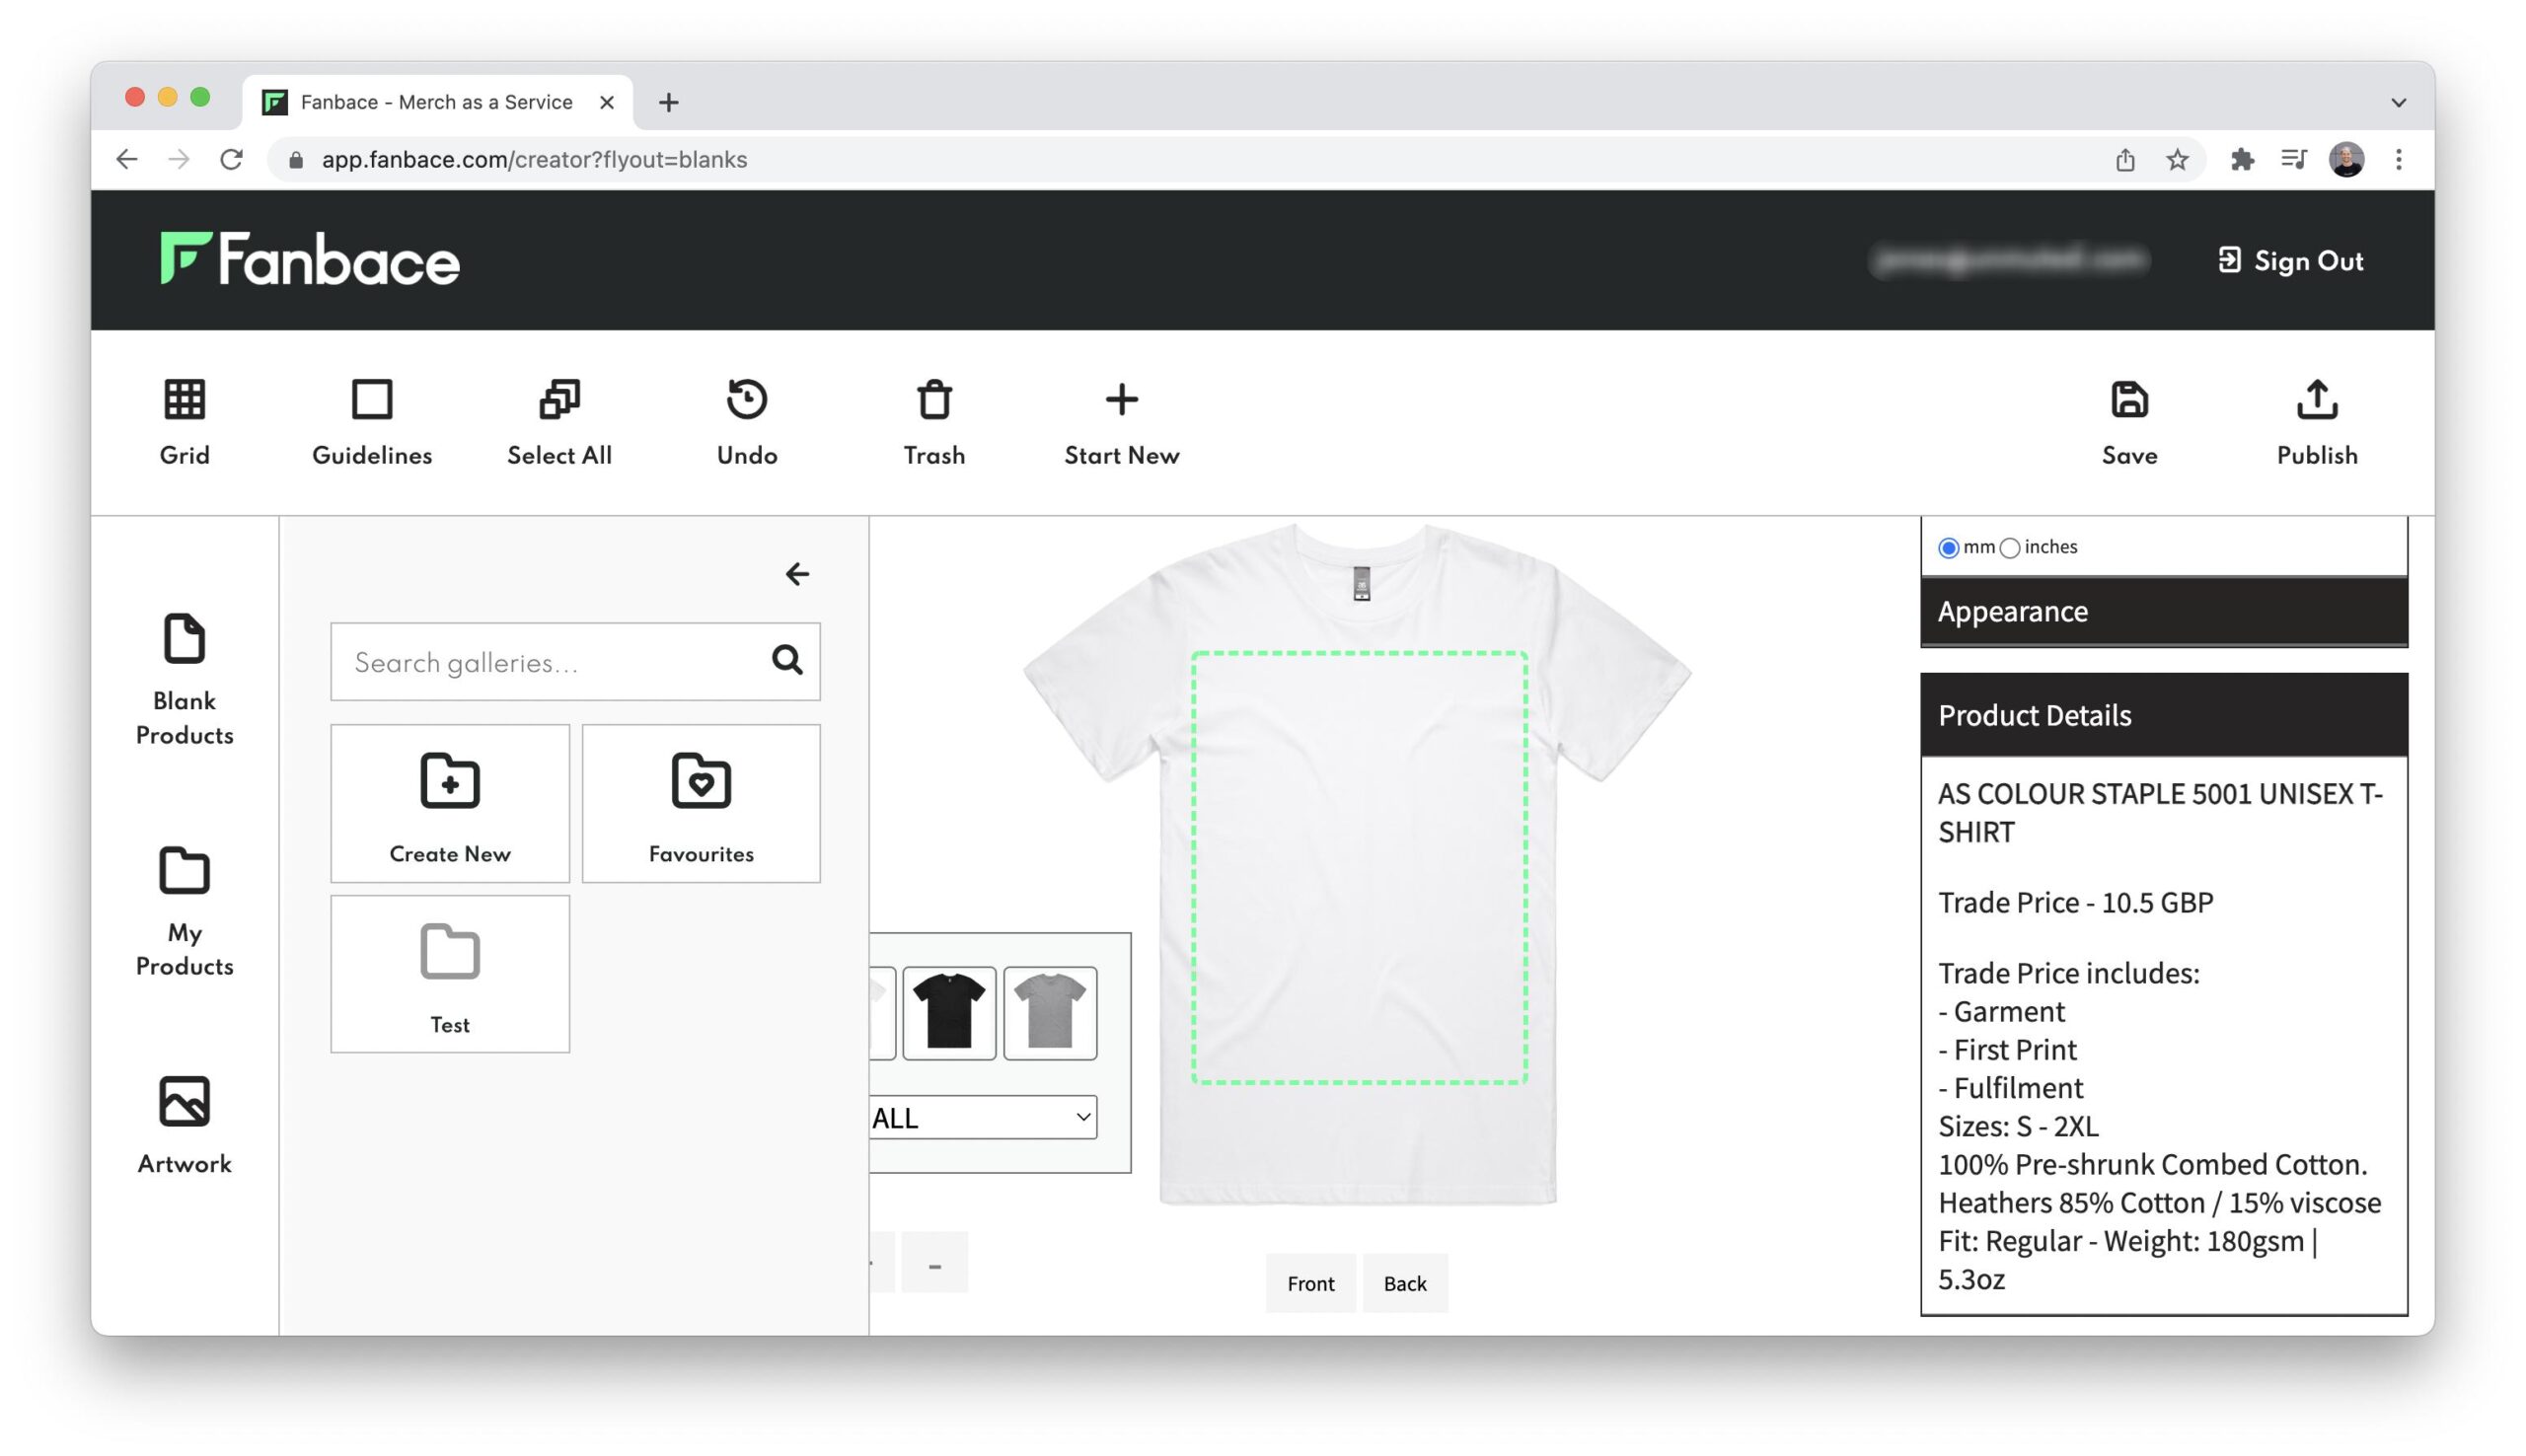
3. Preview your mock-up product designs
Once uploaded, select the images and you’ll see them mocked up on the design of your choice. This will open the ‘Appearance’ section of the Product Creator on the right side of your screen. In this section, you’ll be able to edit the images.
Try to flip, crop and scale them to create the perfect design. With certain products such as t-shirts you’ll be able to add an additional design to the back of your product for an additional fee.
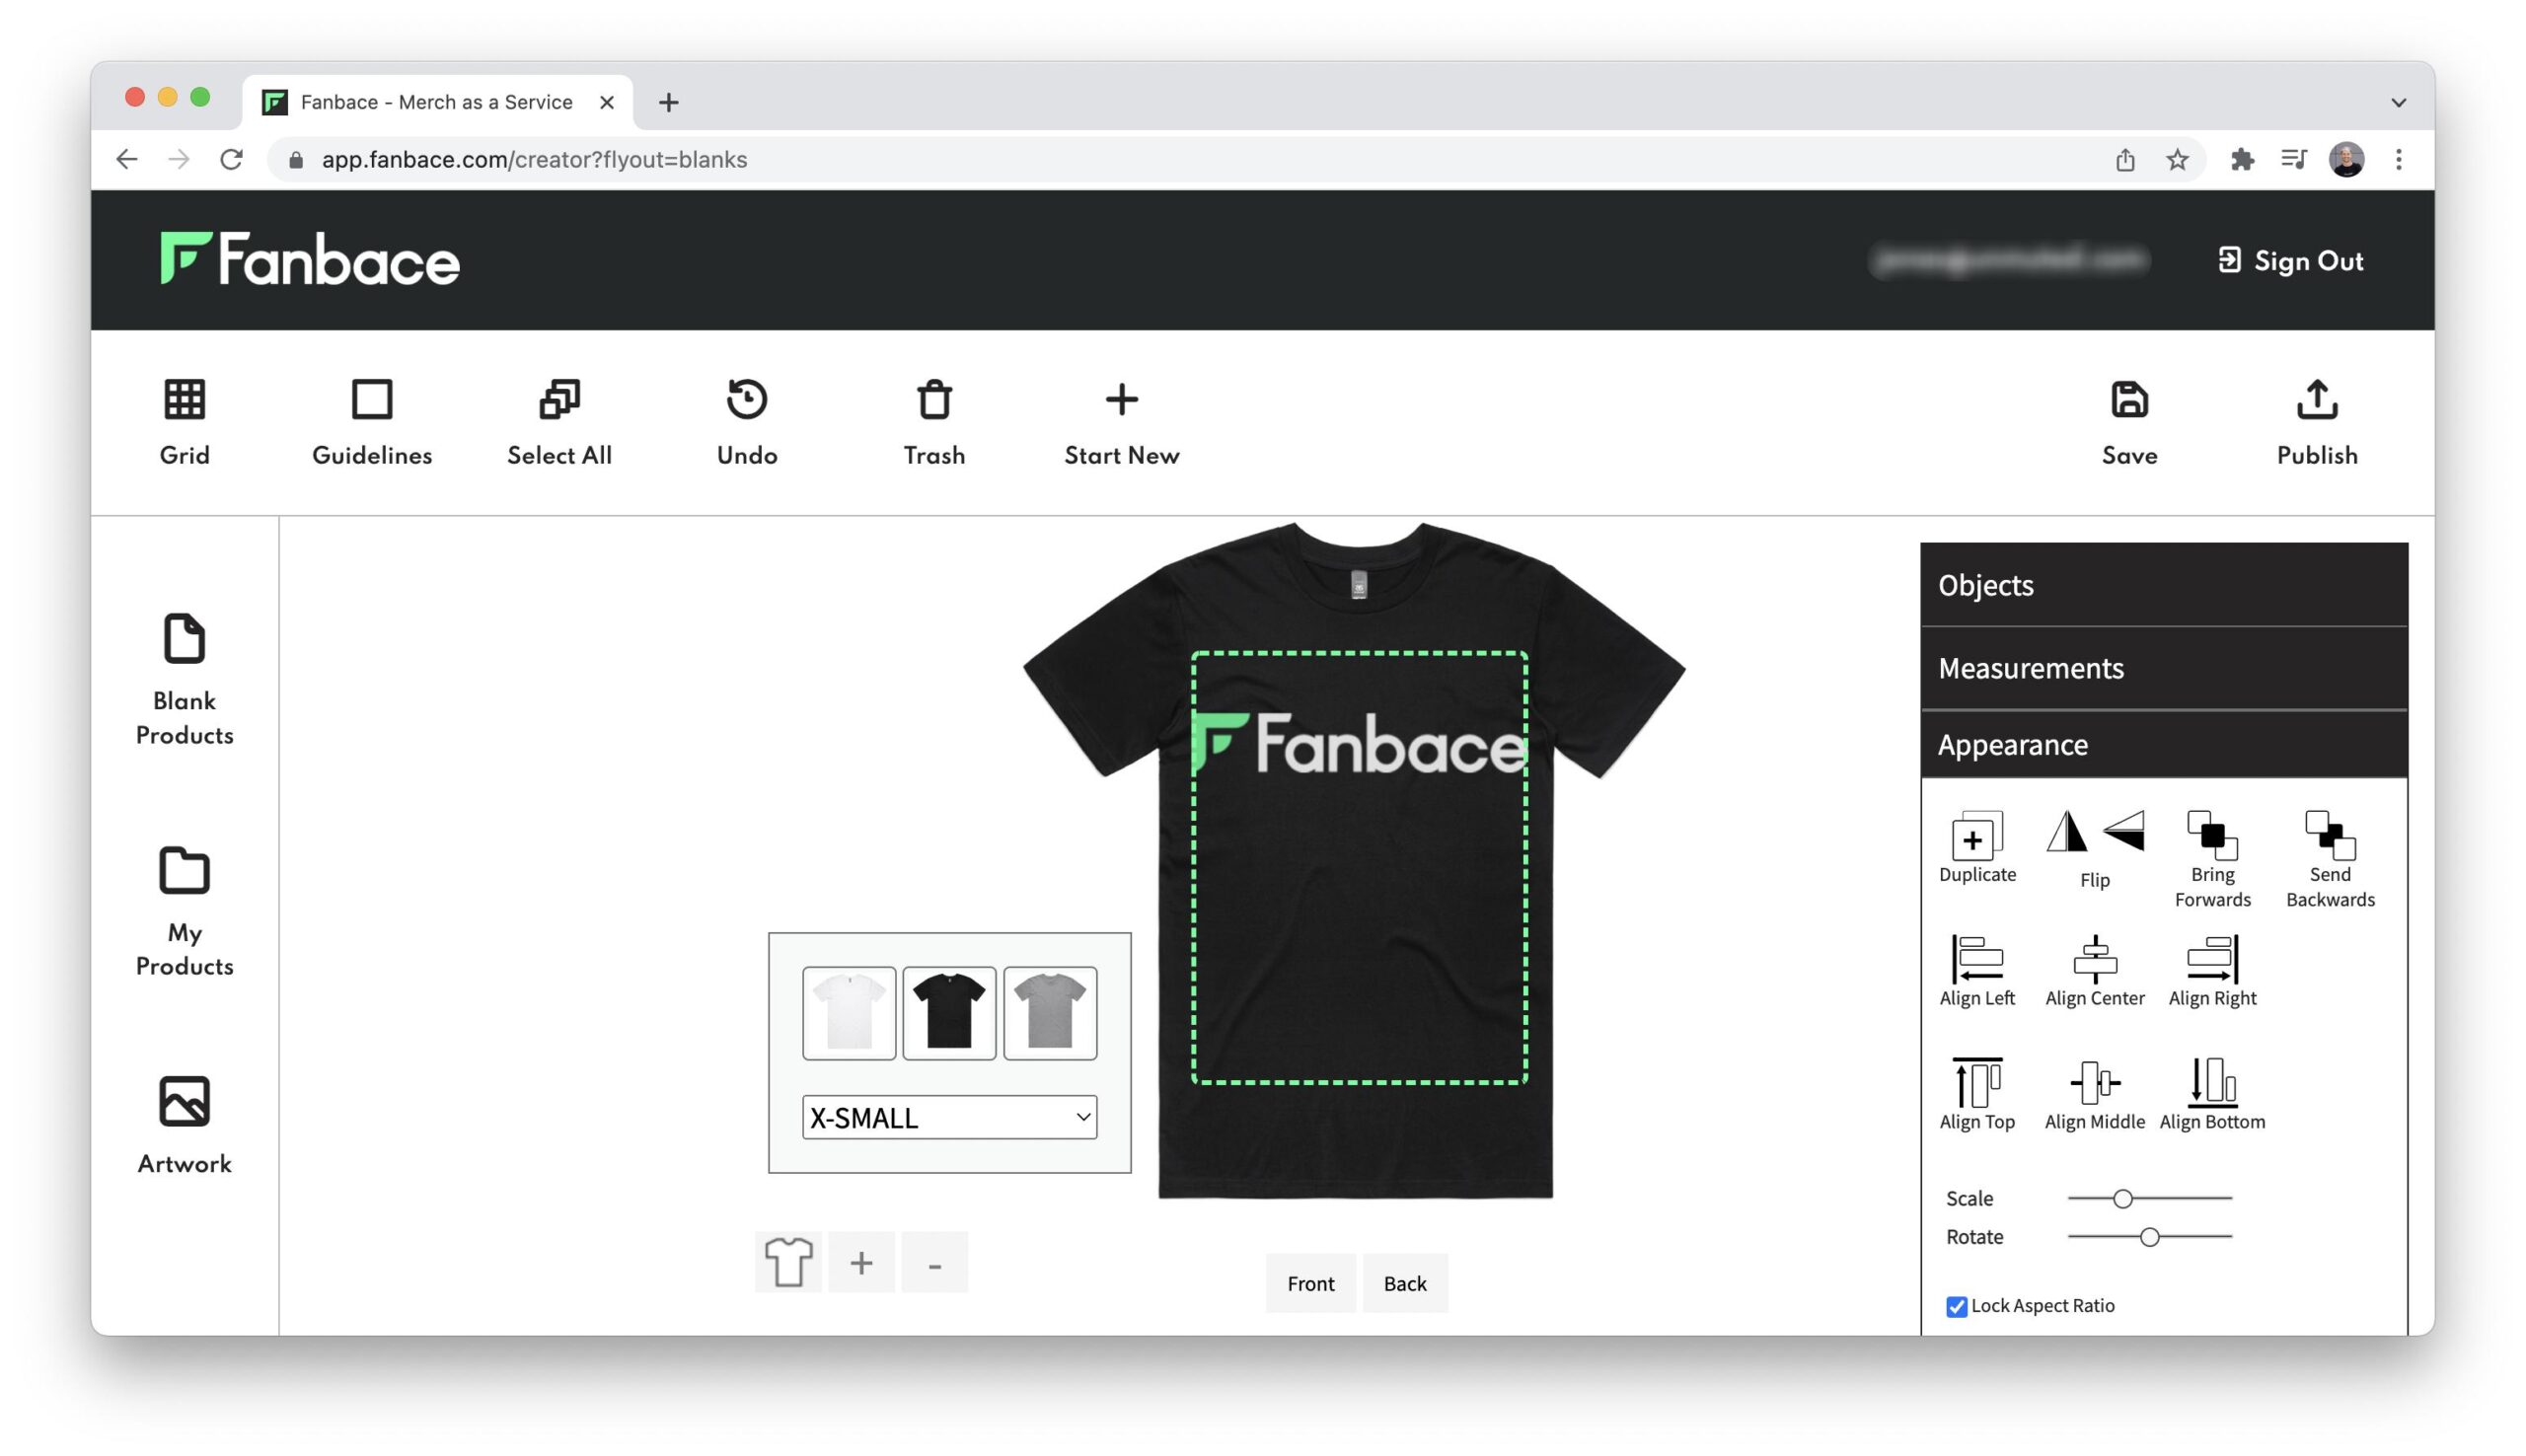
All your changes will be shown live in the mock-up product design in the editor. Once you’re satisfied with your design, hit save in the top right. Try previewing different colour variants to get a better idea of the versatility of your artwork design.
4. Setting a retail price
When you’re saving your creation, you’ll have to name your design and set a retail price, i.e. the price your fans will pay for this piece of merch. We recommend a retail price for you, based on the product’s trade base price, but you’re free to pick any retail price you want.
Make sure you write an extensive product description in the ‘Design Description’ field, as well, as this will be reflected live on the sites you want to sell through.
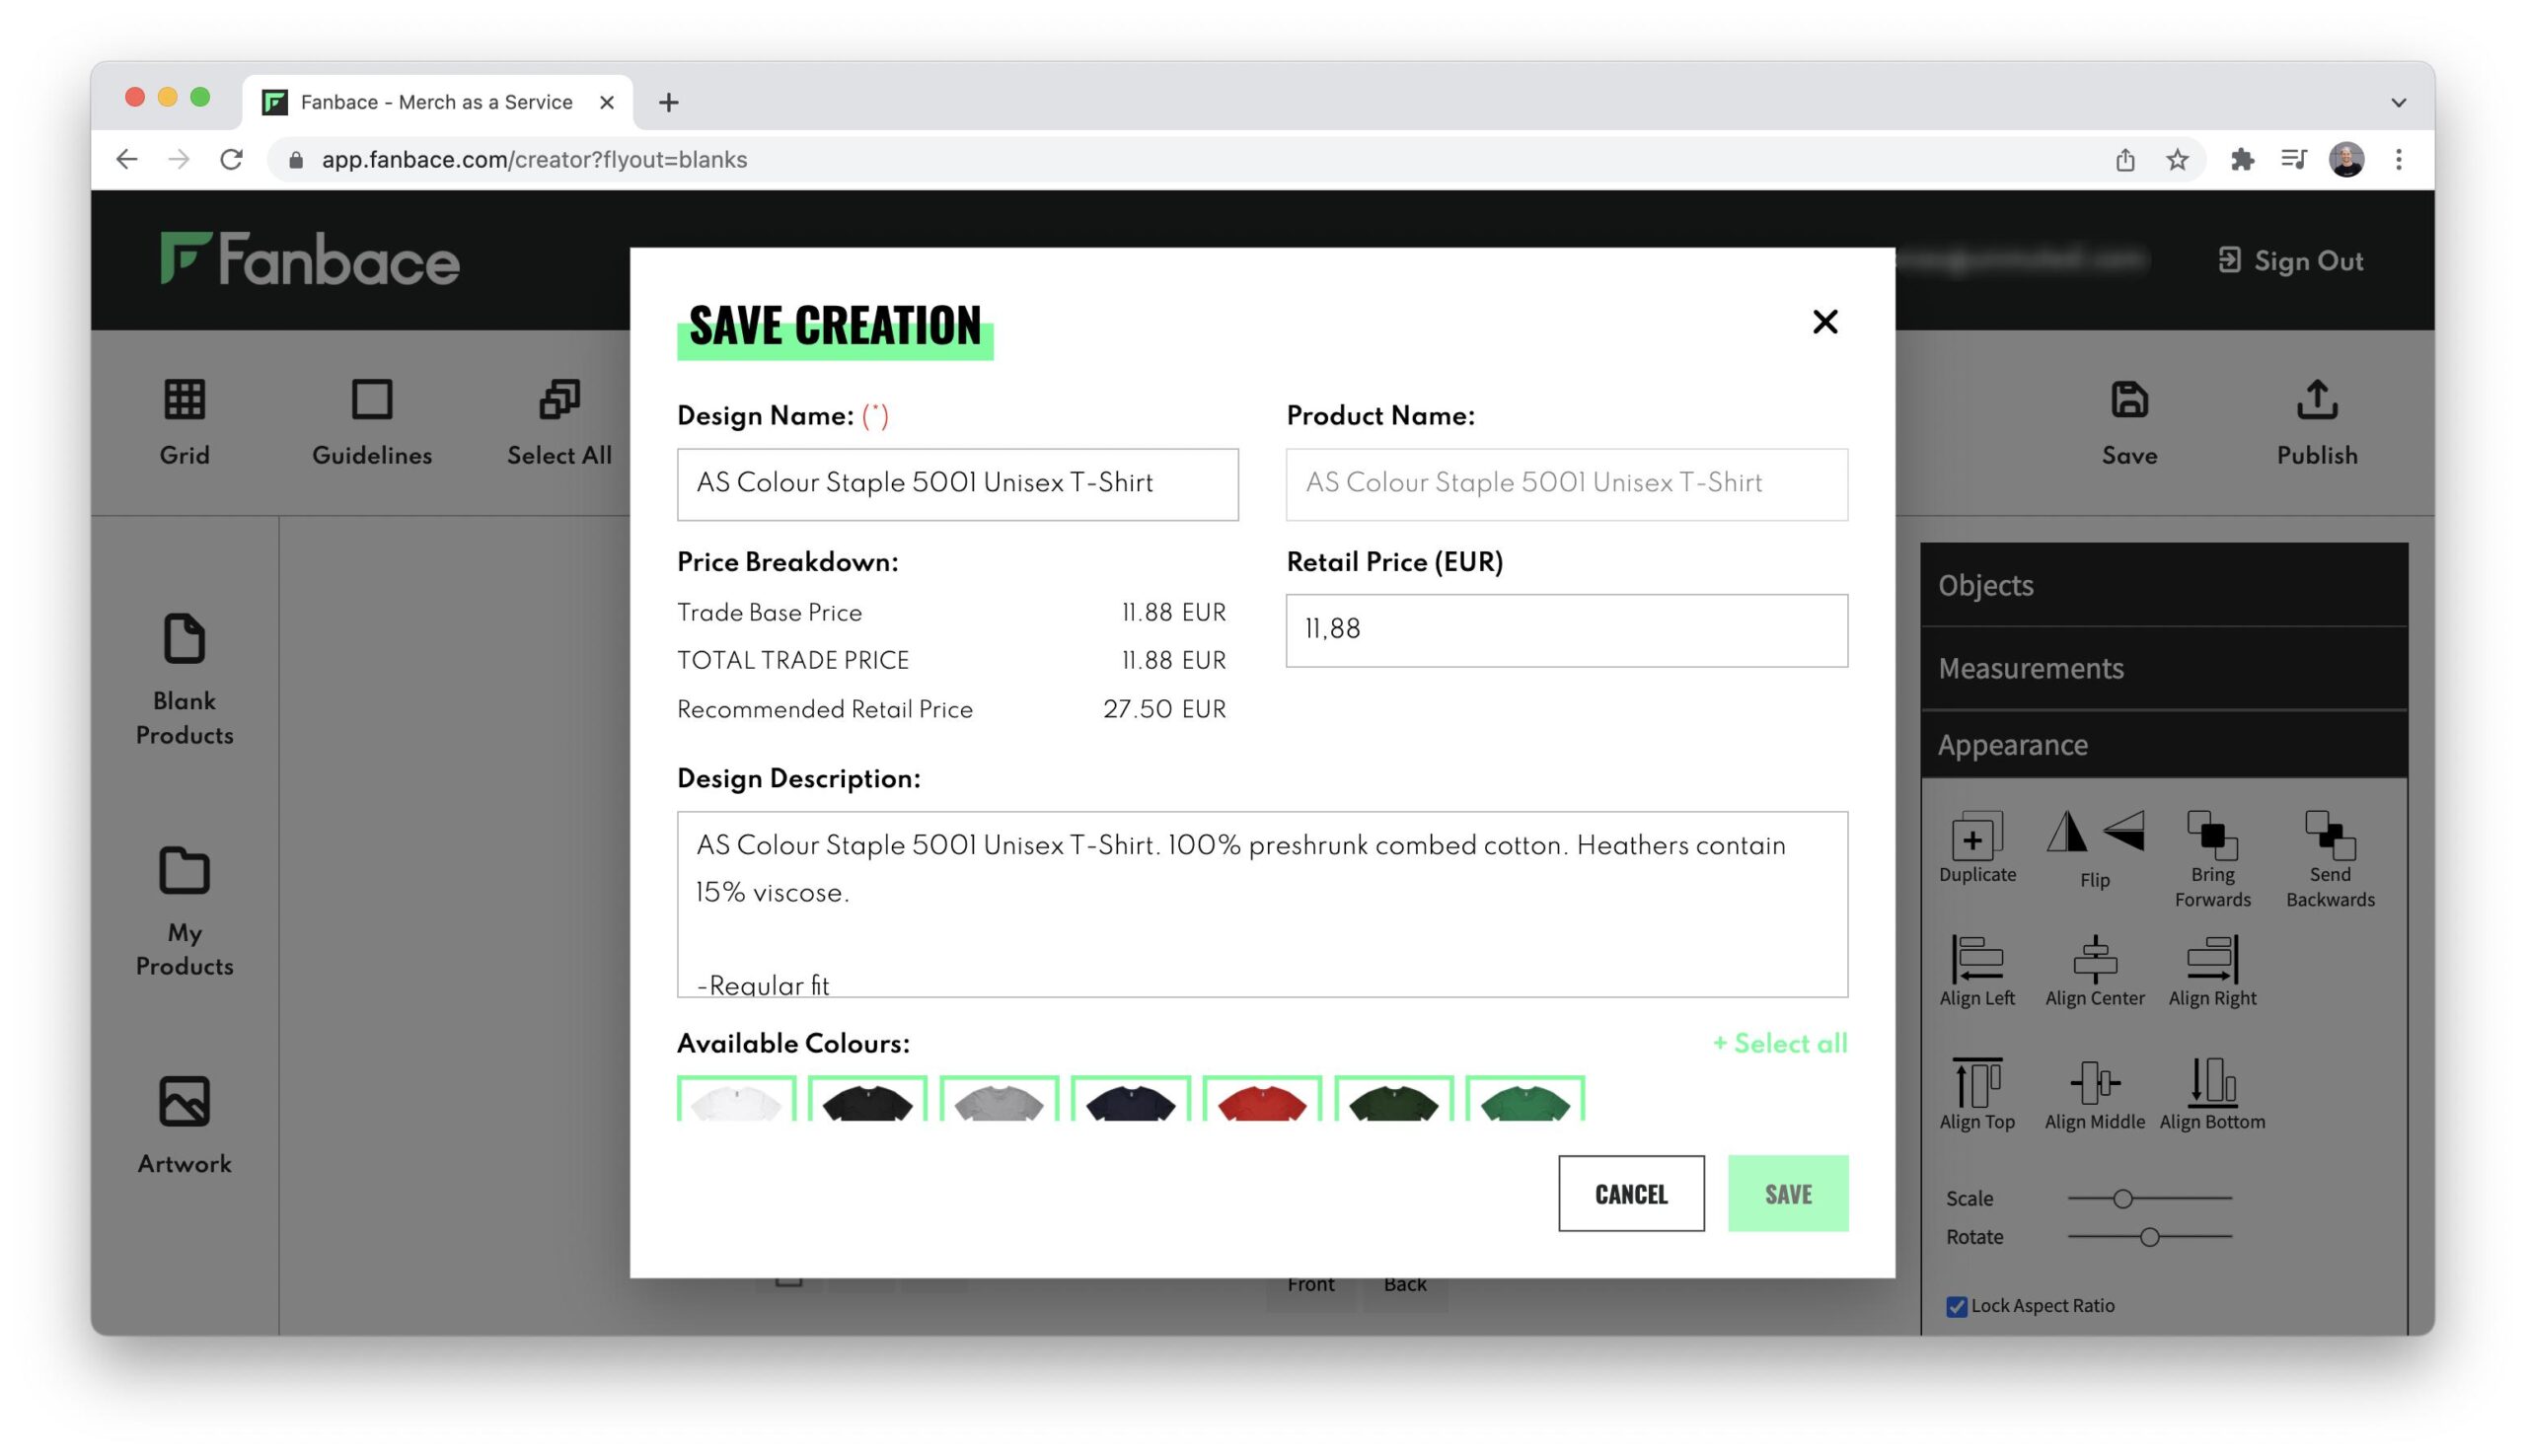
In this overview, you’ll see exactly how much you’ll be charged by Fanbace for the creation and distribution of your product. This allows you to work out your estimated profit by deducting the trade price from the retail price.
Please note that shipping costs are extra and will be added for you at checkout.
5. Choose product colour variations
Next, choose the colour variants you want to offer for this product. The ones you select will be highlighted in green. Make sure you tick the checkbox of whichever colour variation you’d like to be set as default. This’ll be the first colour fans see when they browse your designs.
All that’s left to do now is save the finished design to one of your merch category folders. This allows you to organise your merch around specific themes or marketing campaigns.
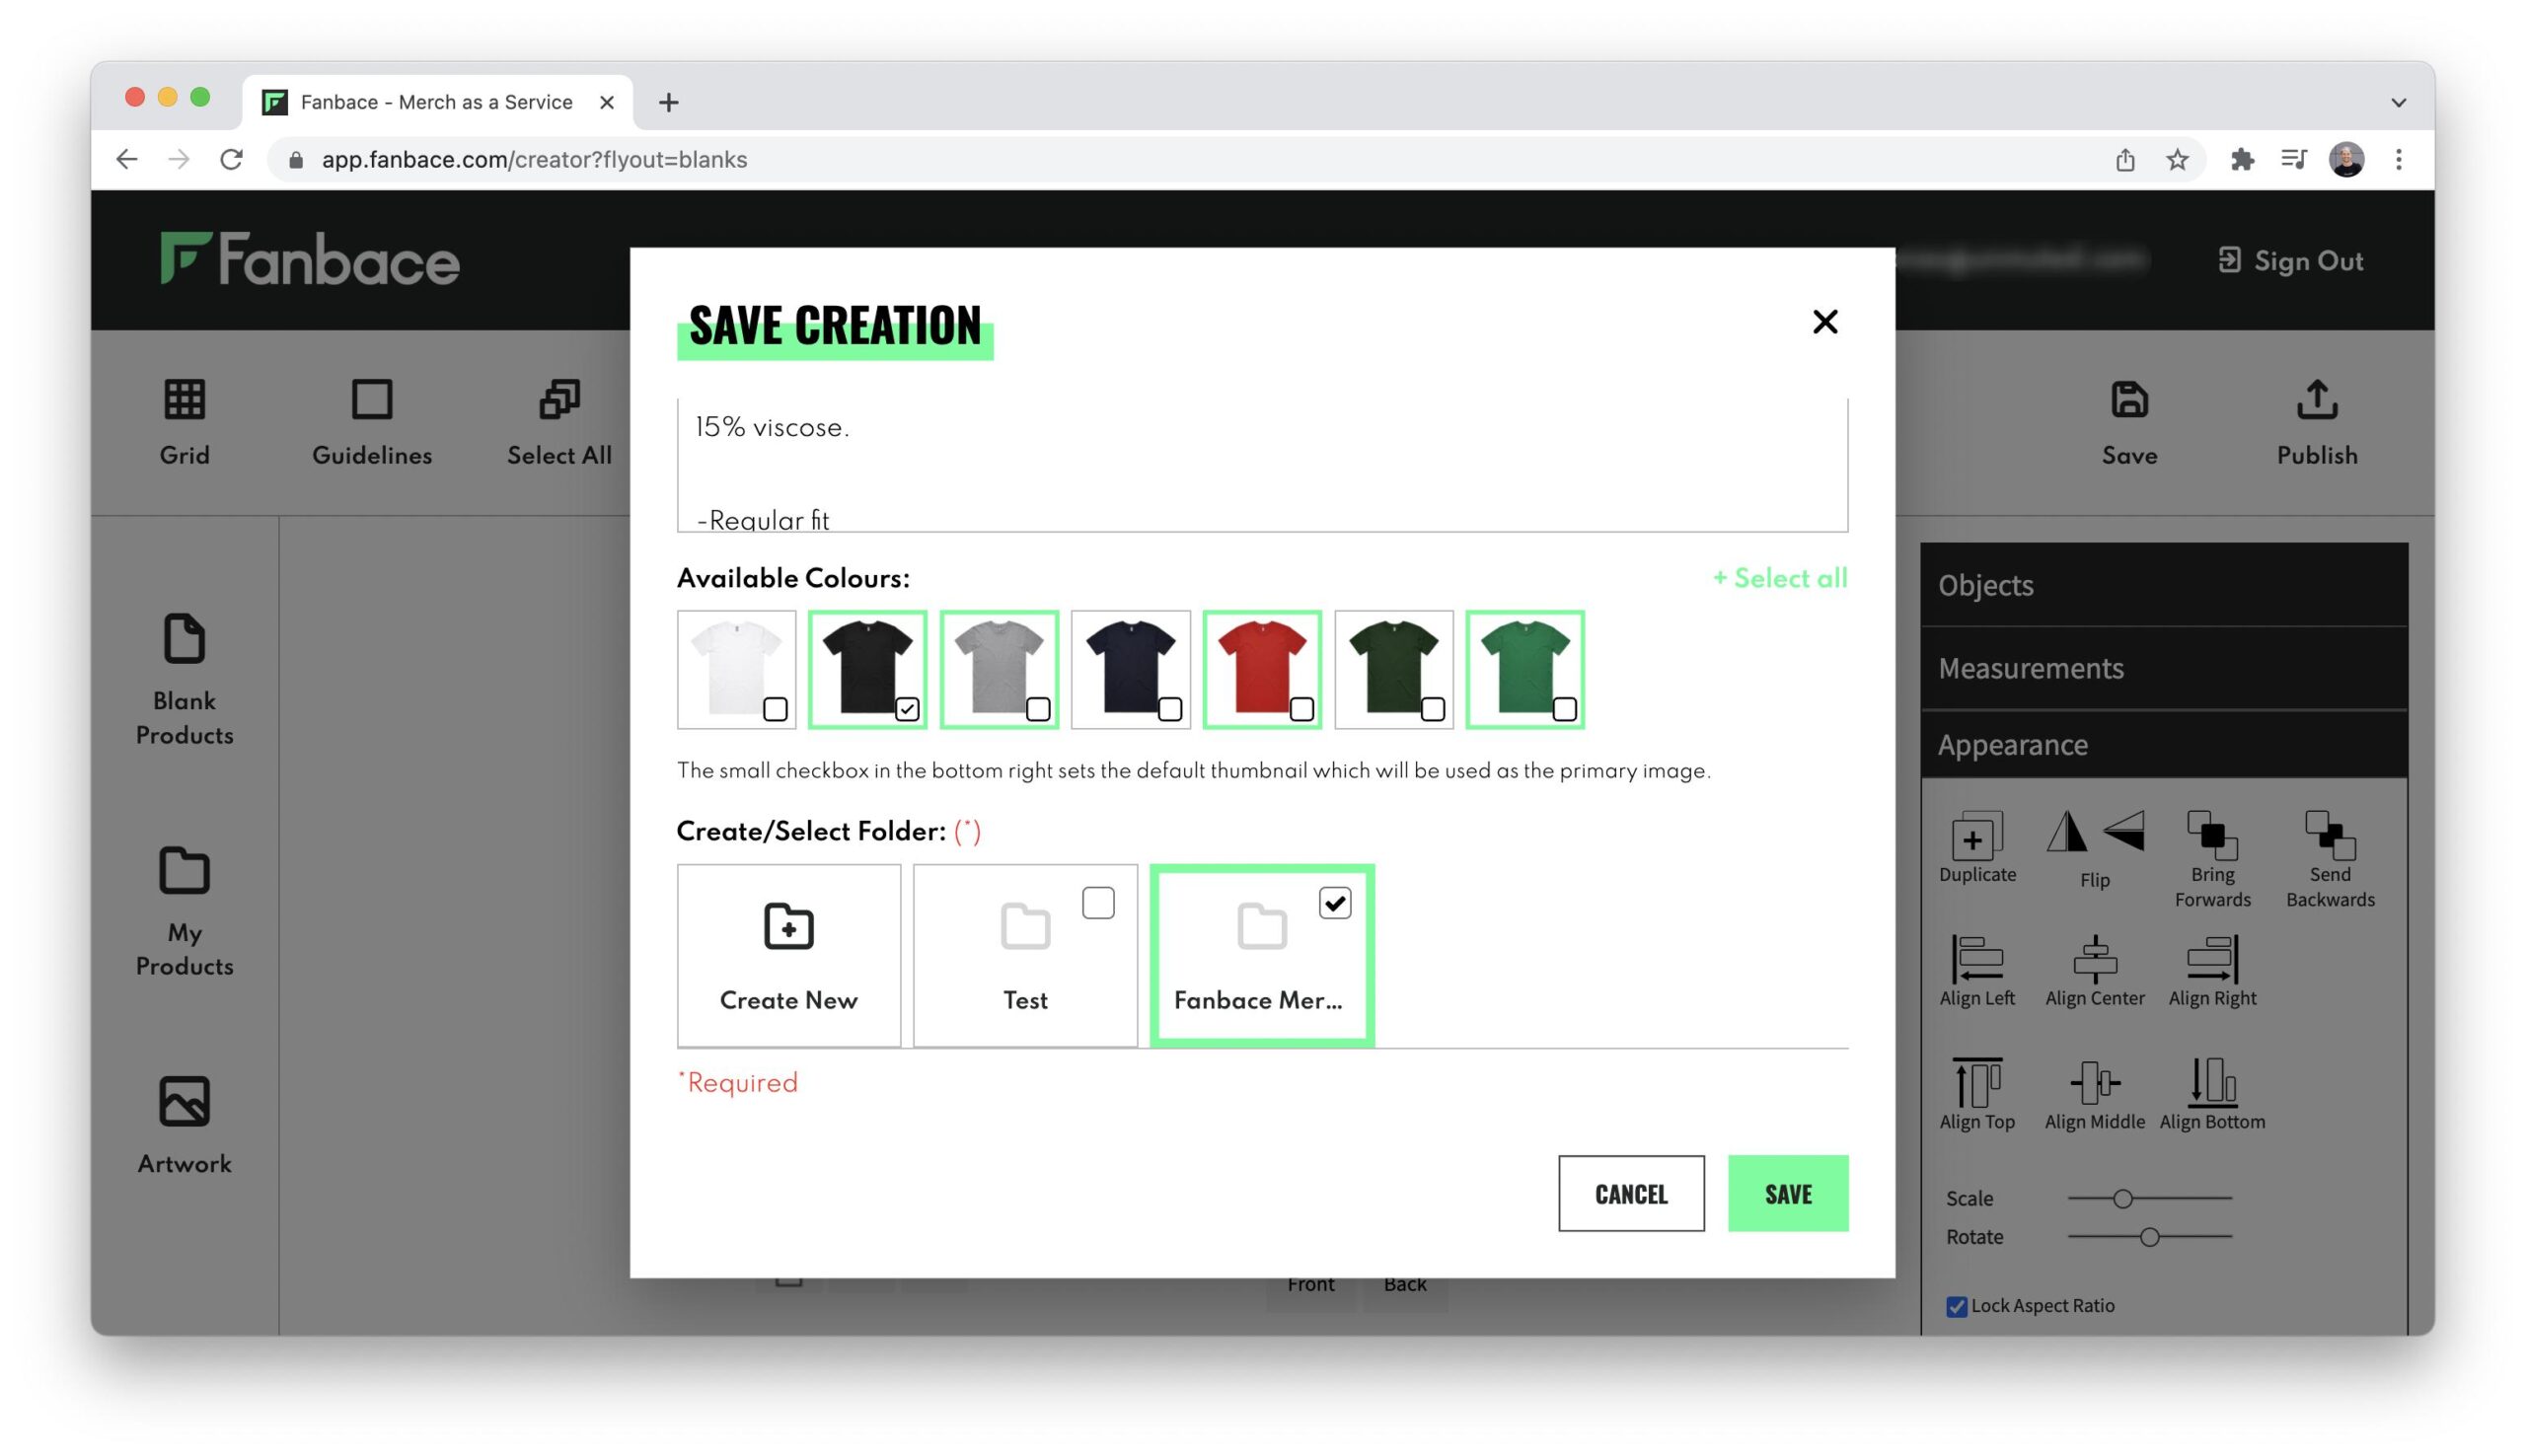
Hit the Fanbace button in the top left-hand corner and you’ll return to the dashboard. Go to the ‘My Products’ section to check out all the products you’ve created so far.
Next, we’ll show you how to connect Fanbace to your Bandcamp account
P.s. If you want to use Shopify to sell your Fanbace products, have a look at our video tutorial.
Connecting Fanbace to your Bandcamp Account
TL;DR check out our video tutorial on how to connect Fanbace to your Bandcamp account.
To get started and sell your first piece of Bandcamp merch, you’re going to need a Bandcamp artist account. It’s important you’re not using a fan or label account, or the integration with Fanbace won’t work.
Don’t have a Bandcamp account just yet? You can create one by following this link.
1. Set up Fanbace as your distribution partner
From here, you’ll need to invite Fanbace to serve as your distributing partner on the Bandcamp platform. You can do this in your Bandcamp dashboard, simply hit the ‘Account settings’ button in the top right-hand corner of your screen and head to the ‘Tools’ section.
This’ll open a new page where you can view all of your Bandcamp tools.
Head to the ‘Sales’ section and find the physical products settings. Click on the ‘orders page’ button. This will allow you to connect Fanbace to your page by clicking “Give a fulfilment partner access to this page.”
Important: you’ll need to enter the email address orders@fanbace.com into the textbox when prompted. This will send an email invitation to our team, allowing us to finalise the connection between Fanbace and Bandcamp.
2. Wait for Fanbace to contact Bandcamp
We’ll then contact Bandcamp to enable the ‘SKU’ option on your account, allowing us to fulfil your orders. This could take up to 48 hours, but we’ll inform you as soon as everything’s connected, so you can start uploading your Fanbace products to Bandcamp.
Adding your first Fanbace merch to Bandcamp
TL;DR check out our video tutorial on how to add Fanbace products to Bandcamp.
Set up your Fanbace account, created your first products, and linked Fanbace to your Bandcamp account? It’s time to start uploading your products.
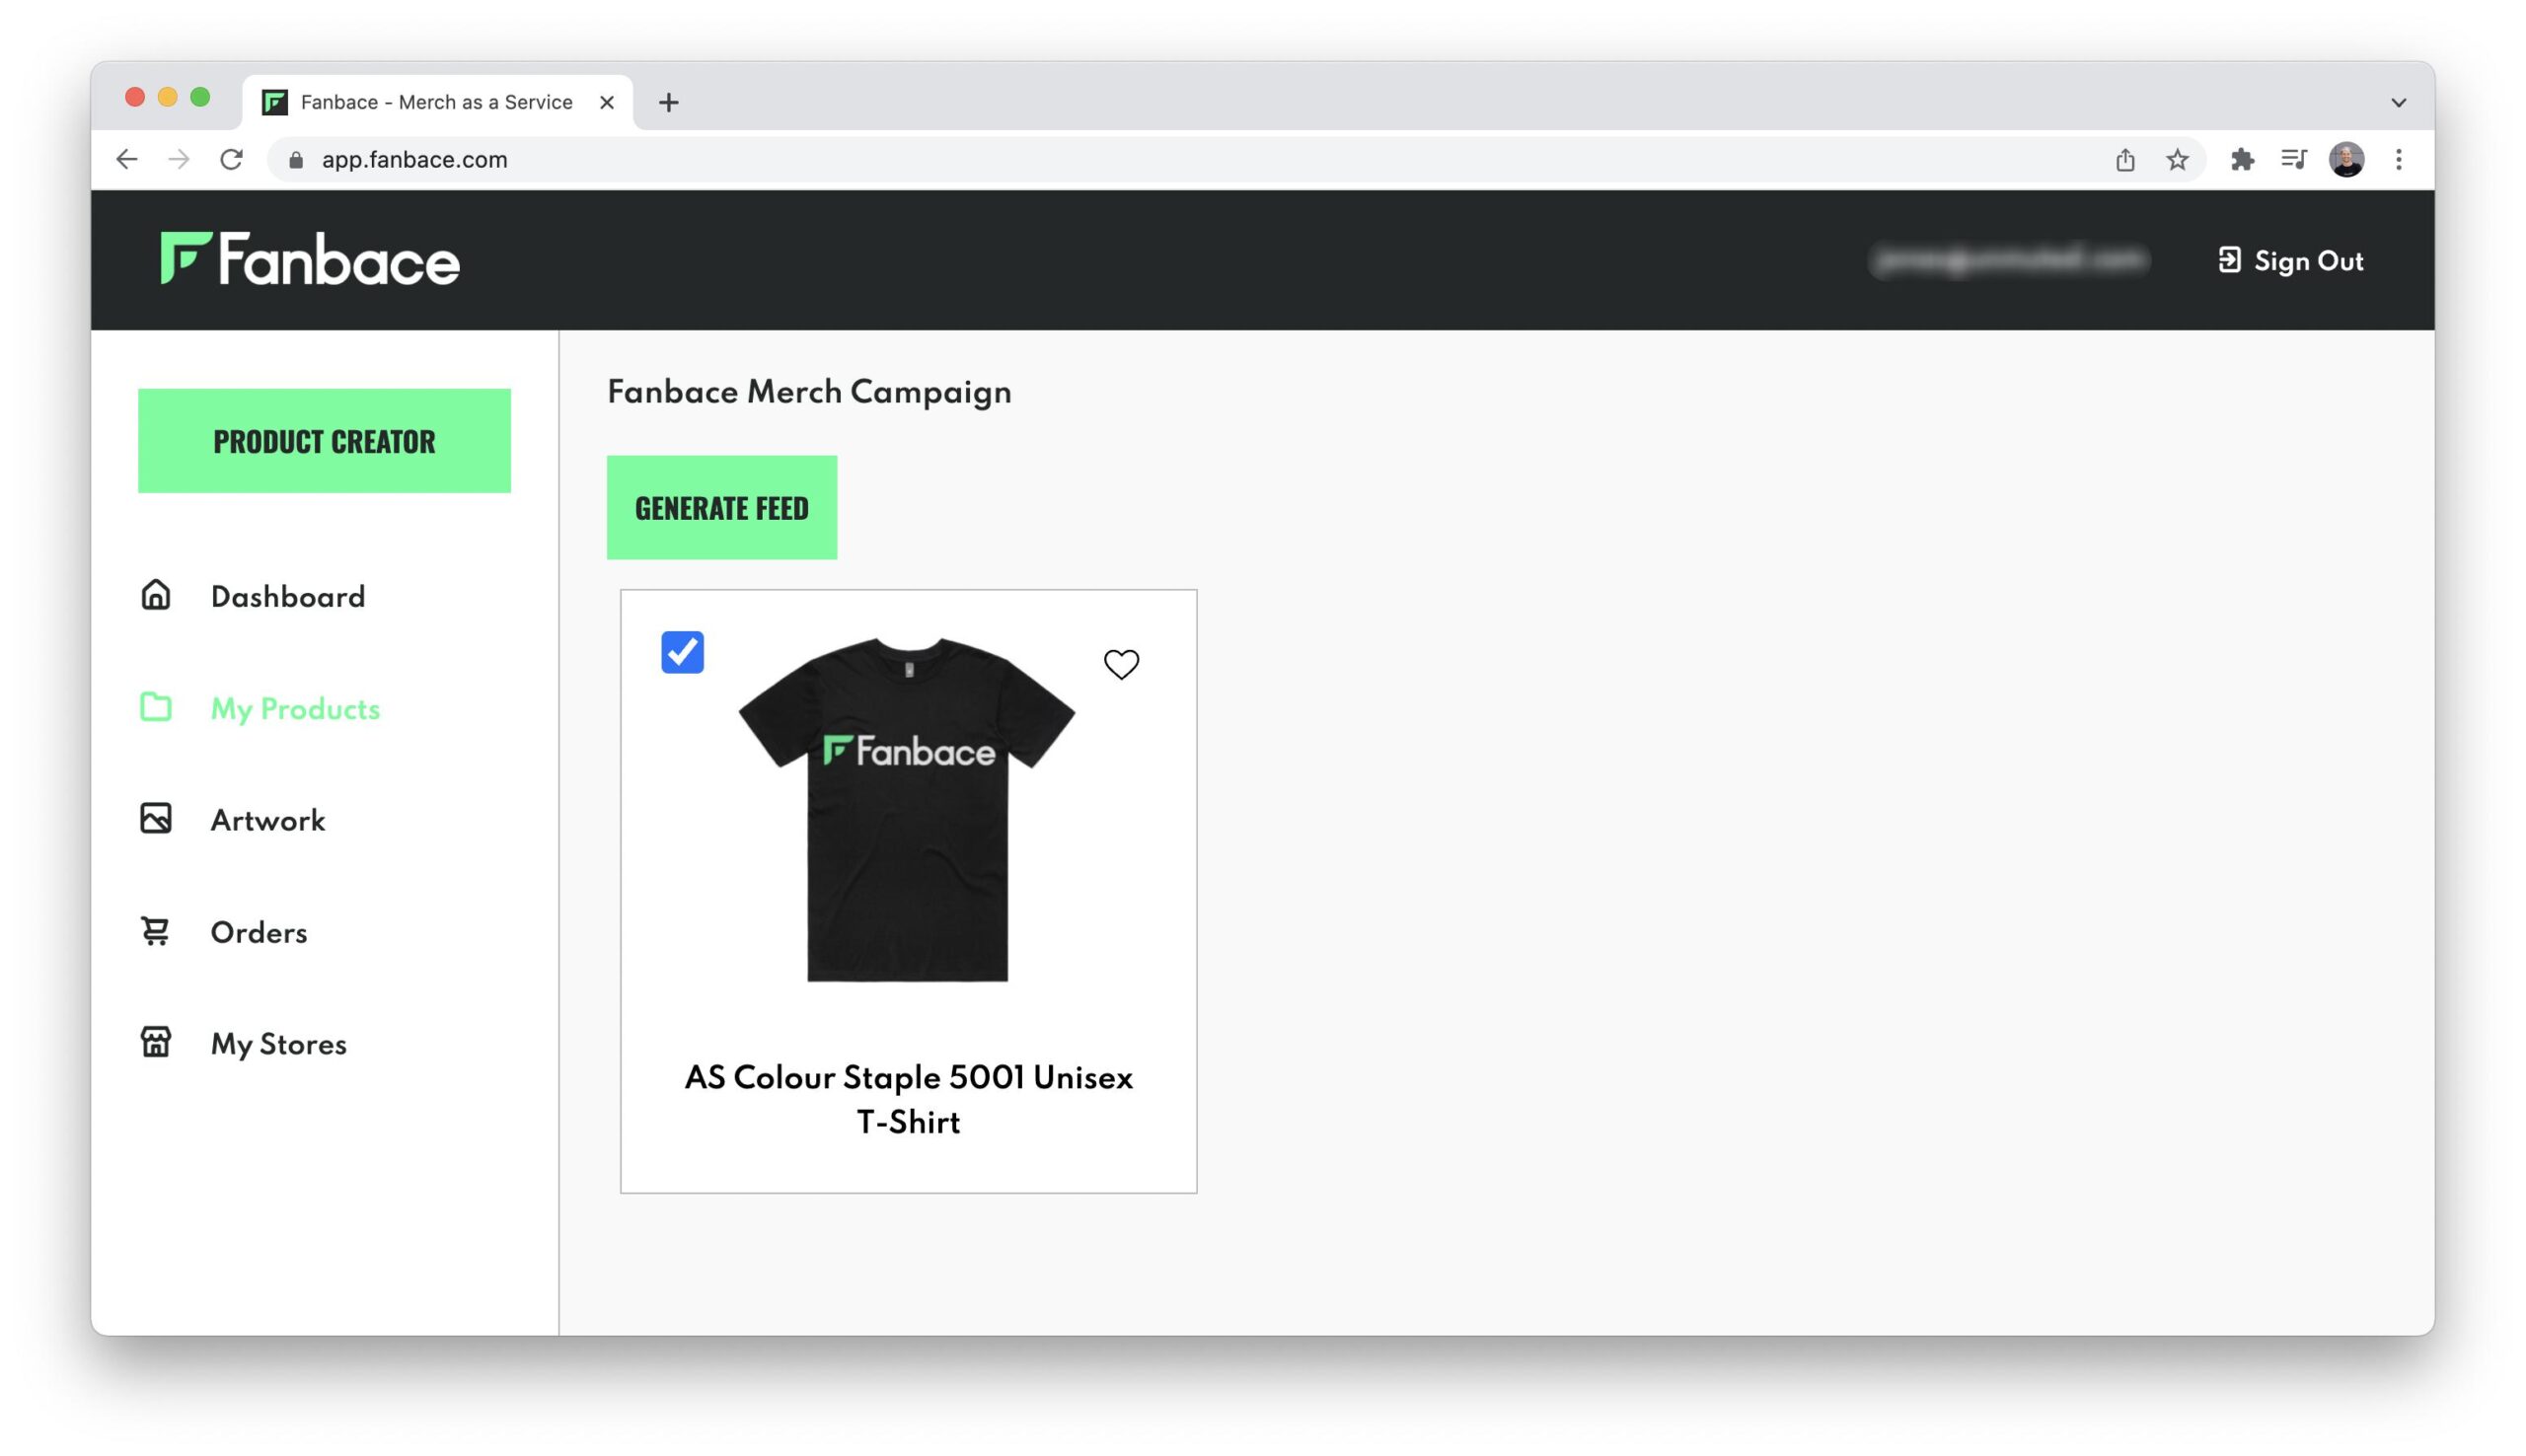
1. Select the products you want to sell on Bandcamp
Once you’ve created the products you’d like to sell on Bandcamp, select them from the ‘My Products’ tab in your Fanbace dashboard. This is where all your products are saved.
Select the desired products and they are highlighted in green, then choose ‘Generate feed’.
2. Download a CSV with product SKUs
Select the ‘Feed File Download’ button, choose ‘CSV’ from the dropdown menu, then choose ‘Generate feed’. This will download a CSV file containing your product data, like name, description, product images and its recommended retail price (RRP).
The most important parts of this file are the product ‘SKUs’ that it contains. SKUs are alphanumeric codes assigned to inventory that allows retailers to track their stock, measure sales by product and category, design store layouts and flow, and enhance shopping experiences.
Bandcamp and Fanbace need these SKUs to organise the combination of colour and sizing options your fan picked. Basically, SKUs are designed to make sure your fans get the right product in the right size and colour variation.
3. Upload your products to Bandcamp
To upload your products to Bandcamp head to your artist dashboard, click ‘+ add’ in the top left corner, then select ‘Merch’.
Fill out the form with product information like title, description and product images. You can copy and paste this information from the CSV file you downloaded from Fanbace.
4. Add product images to your Bandcamp merch
For the images you add to Bandcamp, find the product mock-ups included in the CSV file. You can find the front design of your product under the column titled ‘super_large_snapshots_url’.
The back images of your product mock-ups are under the column marked ‘additional_images’. Simply copy and paste the links in the CSV file to your browser and download the file from there.
5. Set the retail price and shipping costs for your products
Once you’ve uploaded your product images, set the Bandcamp retail price. You can choose your own or follow the price Fanbace automatically recommends.
After this, you’ll be prompted to define your shipping costs. You’ll find all the information you’ll need in our FAQ section.
6. Set quantity to unlimited and add additional variants
As Fanbace creates your products on demand, you can set the quantity available to unlimited. Next, you’ll need to add each of the variants for your products.
As each variation only has one name and SKU, you’ll need to keep adding options for each variation in size and colour. For example, ‘XS – White’ would be its own option, with its own individual SKU as found in the CSV file.
Don’t worry about re-adding the product names. You just need to update size and colour, as the product name will be the same for all variants. You can find all of the relevant SKUs under the retail SKU column in the CSV file. Copy and paste these SKUs straight into Bandcamp.
Important: make sure you add the SKUs correctly, as these determine whether your fan receives the exact product they purchased.
7. Finalise your Bandcamp merch store
Bandcamp products can only feature up to 20 variants. A t-shirt in three colours and six available sizes will equal 18 variants. However, you can choose whichever 20 variants you’d like available to be created by Fanbace.
If you’d like to offer a wider variety of colour options, you can create several products on Bandcamp – one for each colour – and simply use the ‘Add product option’ button to add each size rather than a size/colour variation.
Once you’ve added all your Fanbace products, make sure you set the product options to public. You’ll immediately be able to view your new products on your Bandcamp artist merch page.
Fans will also be able to purchase these straight away, with no further work needed on your behalf. The only thing left to do is to start promoting your new band merch across your social media and other distribution channels
Interested in setting up your Bandcamp store using Fanbace?
Do you need help setting up your Bandcamp store using Fanbace? We’ve got you covered. Our platform is completely self-serve and easy to set up, but we’re here to help you get started.
Use Fanbace by either signing up for free or visit our contact page to get in touch with our team for a quick demo. Looking forward to helping you get set up, and remember: every day’s a merch day with Fanbace.